
Gravity Flow and Gravity Forms are a match made in heaven when it comes to collecting payments. Remembering to manually send invoices or keep tabs on all those outstanding payments can really get in the way of your ability to focus on your main job.
Gravity Forms, of course, can help you set up professional looking forms from invoices to emails and checkout pages. But, adding Gravity Flow into the mix also means you’re able to collect payments based on a customer’s actions or the phases of a project, allowing you to save valuable admin time and boost your cash flow.
In this article, we’ll look at why you should add a workflow to the equation — and start collecting payment without a headache. Let’s dive in:
Collecting Payments–Why Workflows Matter
While it’s obvious why you would collect payments at all, there are numerous cases where collecting payments isn’t a one-and-done affair, with an order confirmation and goods and services at the end of the tunnel.
Adding payments to your workflow brings some significant benefits to the table. For one, maybe you need to keep following up with a client who hasn’t paid you for your work. Or, perhaps you offer a service with multiple steps—a pay as you go situation.
An example would be any service billed in multiple stages Think medical or legal bills, or a large project like a website redesign.
Another example is a subscription service—you bill clients on the same day each month. The passage of time is the trigger event—while payment acceptance or declined transactions can trigger the next step—an invoice or an email that asks for an alternative payment method.
Or, perhaps, an approval is required before the invoice can be processed. In any case, Gravity Forms and Gravity Flow can team up to ensure that no payments slip through the cracks.
Here’s a look at where you can use payment collection workflows and a little refresher on how to set them up.
Gravity Flow & PayPal
One option for collecting payment is through the Gravity Flow PayPal Extension. This process allows administrators to add a single payment step anywhere in the workflow. For example, the amount may be requested at the end of a workflow where the customer approves a charge or is happy with the service they’ve received.
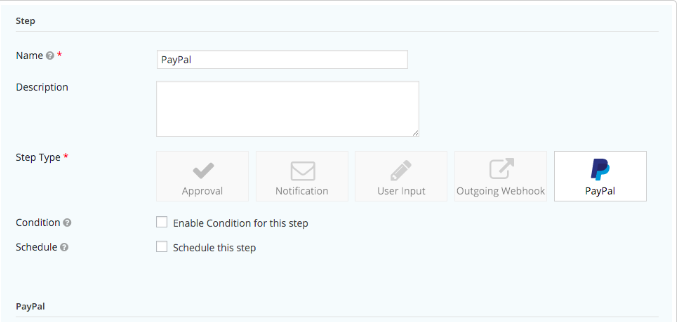
How to set it up:
Before you start, make sure you’ve already added the PayPal add-on to Gravity Forms.
The step settings are very similar to parameters for the User Input step. Configure the standard settings, assign the step and configure the assignee email as you would a User Input step.
A confirmation will appear after the recipient submits their payment through the PayPal site. Still, it may take a few minutes for you to receive the payment—PayPal sometimes has a delayed processing time.
Once the PayPal IPN has confirmed the payment, the process will continue to the next step. That could trigger a confirmation email, a thank you, or release access to a piece of content—it’s up to you how you configure your workflow.
The Form Submission Step: Stripe & Authorize.net
So, PayPal can be used at any point in the workflow—because we know that running a business doesn’t always mean a clear-cut e-commerce scenario. The form submission step allows an administrator to add a payment promptly at any point in the workflow for any of the official Gravity Forms payment gateway add-ons.
Imagine you have a SaaS product and you’re walking the reader through a series of steps. Adding a payment form after they complete a series of actions means you can collect payment without sending them elsewhere.
Additionally, this option works well for businesses that sell services—billed by project milestone. So, one design is completed, the client is prompted to pay. At phase two, same thing, and so on. The initial step is an approval, followed by a form submission step (form is sent to the customer) and a user input step (customer confirms payment, submits).
Here’s how it works:
The Form Submission Step is part of the Form Connector Extension, which allows Gravity Flow admins to add additional steps to workflows on the condition that require the submission of a different form.
The Form Submission step supports all payment add-ons which are built on the Gravity Forms Payment Add-On Framework. This includes the PayPal Payments Standard Add-On, the Authorize.net Add-On, the PayPal Payments Standard Add-On, and the PayPal Payments Pro Add-On.
For example, if you’ve set up a workflow that takes a user through an entire onboarding process—you may want to ask for payment at each phase in the process. So, that could mean an initial deposit or a consulting fee upfront, followed by a payment at the mid-point, and the final instalment.

The benefit of adding the step is, it must be completed (payment received) before the Workflow can progress. While this process is convenient, it can help protect against non-payment, too.
You’ll never complete service without proper payment, and you won’t waste time combing through your records.
The Form Submission step can have more than one assignee, and it also supports conditional routing. This can be useful if you need multiple people to submit a form before moving on to the next step. The assignee policy setting defines whether the step will wait for all assignees to submit the form or just one.
Conditional Payments
This step presents another way to collect payments from other gateways—not just PayPal. And multiple payments too. Conditional payments allow you to choose whether a user pays through one portal or another.
This is a solution for times where you want to give customers multiple options for payment. For example, maybe you want to include PayPal and Stripe or PayPal and Authorize.net.
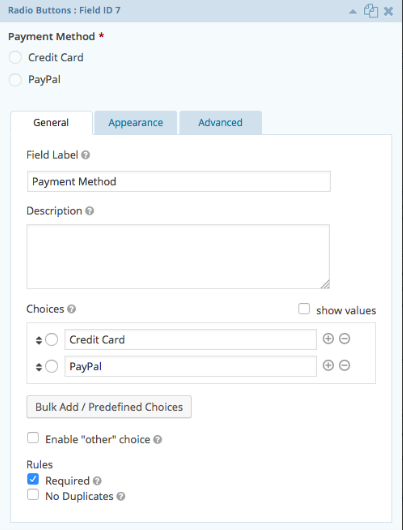
When you create a form, make sure you select that you want to use multiple payment gateways.
Add a radio button to your form, adding each payment option—say, PayPal and Stripe—as your two choices (you can add more). This allows the customer to choose how they want to pay—by entering their card or their PayPal details. Then set rules as “required.”
Then, you’ll check the box that says, “enable conditional logic.” This allows you to show different fields based on the option your customer chooses. If Stripe—then credit card fields will show up.
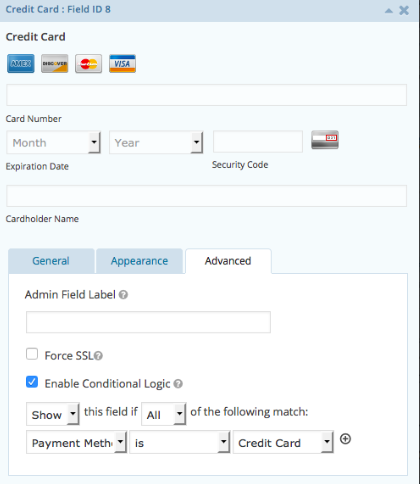
From there, your work is done on the form side of things, but you’ll need to make sure you enable conditional logic from both the Stripe and the PayPal plugins. And you’re good to go.
Authorizing, Capturing and Refunding Payments
The Gravity Flow Stripe Extension allows even more flexibility. It allows workflows to authorize payments during the initial form submission, capture or cancel the payment at a later date, and also refund payments.
For example, the form can take the credit card details and authorize a payment during the initial form submission. Then the form can have a series of User Input and Approval steps to complete a process. Then at the end of the process, the payment is captured.
Of course, the time will come when you receive a refund request so you’ll need to plan for this eventuality. With the Stripe extension, you can save admin time by building an automated workflow which will allow customers to request a refund and then allow an administrator to approve or reject the request with a one-click approval link in an email. The refund will then be processed automatically without the administrator even having to log in to WordPress or Stripe.
After the refund has been processed the workflow could automatically send an email to the customer with a confirmation with a link to a survey asking for feedback.
Optimizing Forms for Payment Information
Now, we looked at some options for adding payments to your workflows, but it’s important to consider how you ask for payments within those forms, too. Don’t ask for too much information when requesting payment.
Fewer form fields tend to mean a better payment experience. In fact, reducing the number of form fields to fewer than 10 has been shown to increase conversions by 120%. Click To TweetThe moment website visitors enter the payment page, there are some anxieties at play. A poor checkout experience can make site visitors bounce away from the webpage in short order.
As such, it’s crucial that you make the process as pain-free as possible. Here’s what you need to know about collecting payments without compromising conversions.
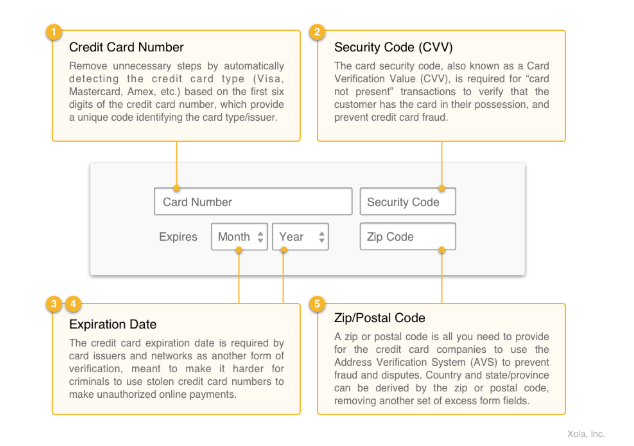
- Credit card number
- Expiration date
- Security code
- Zip/Postal Code
It should look something like this:
In the end, there are countless ways you can adapt this workflow to meet your needs—whether you’re collecting late payments or offer payment plans, subscriptions, and more. Ultimately, you want to make the process easy for the consumer and as automatic as possible on your end.
We hope this guide brings to light some of the many ways you can add a few steps into a workflow—for a transformative accounts receivable experience. Set it, forget it, and get paid.
