In this in-depth tutorial, Jamie Oastler, a member of the development team at Gravity Flow, describes how to set up an automated client onboarding process for a web development agency using popular tools such as Bitbucket and Jira. He highlights the crucial planning stage, includes detailed instructions for setting up the steps and shares lots of ideas for automating other parts of the process. A sample form is also included that contains many of the steps covered in the tutorial.
There are multiple schools of thought on the right time to automate a workflow process, but all agree that the consistency and efficiency of an automated process are valuable to your organisation. Thankfully most digital tools or software-as-a-service (SaaS) platforms offer Application Programming Interfaces (APIs) that can help you turn a manual process that takes minutes and a series of specific page/button clicks to execute into a smaller number of API calls. Making those API calls, determining the next steps to action, and sharing the results used to require programming time/skill to implement.
This article demonstrates how the powerful functionality of Gravity Flow’s Outgoing Webhook step changes that process to be no more complex than setting up notifications or approval steps that anyone can complete.
Client Onboarding Process
In this article, we’ll use Gravity Flow to automate the complete onboarding process for a web design/development agency that uses an agile approach to software development. Before starting to setup steps that integrate with third-party systems, it’s a good idea to map out your workflow to know how those automated steps fit into the larger context.
- Capturing Correspondence
A Gravity Form already captures potential project leads, but after the form submission, all the correspondence with the customer is currently handled via emails. It would be great to be able to keep track of the status of potential engagements and see a clients’ project history without searching through inboxes. - Calculation / Cost Control
Our invoices are still just an Excel spreadsheet. If we change how we price projects, are we sure that the version we’re using is calculating with that new method? What if we have multiple pricing models depending on the project/client type? A centralized workflow ensures the right pricing is applied and can be integrated to Stripe for customer payment or through Zapier for other systems. - Consistent Tooling / Naming Conventions
The more clients and projects we take on, the more important standards for tooling and naming conventions become. Our imagined agency has decided to use JIRA boards to map out user stories and tasks for each project, with Bitbucket for (git) source code version control.
Let’s take a look at the swimlane diagram for this onboarding process.
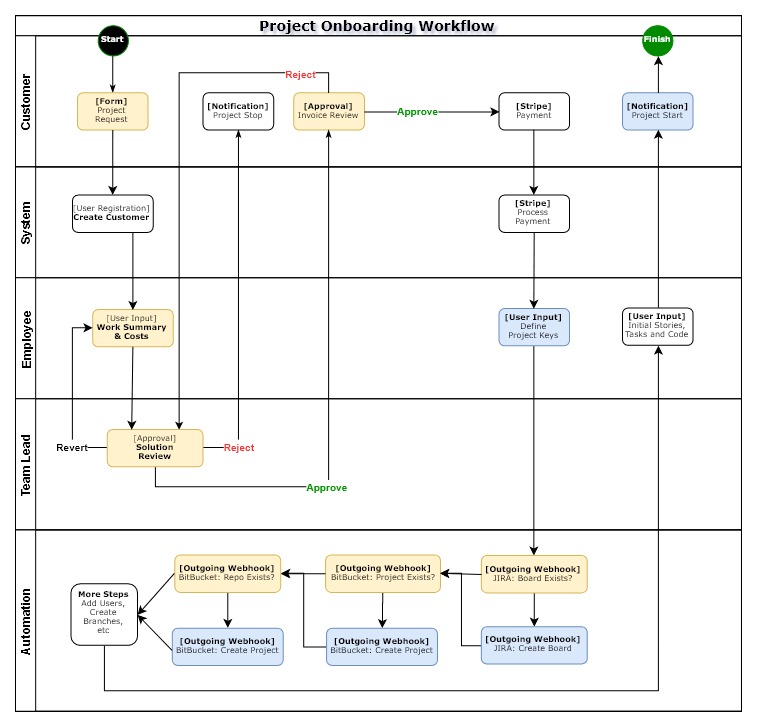
- Blue Steps relate to the outgoing webhook and Jira + Bitbucket creation process. Full step configuration details and screenshots included below.
- Orange Steps are important to an onboarding process, but if you’re familiar with setting up a workflow with Gravity Flow these will be quite familiar to you. Both orange and blue are included in the sample form + steps that you can download to jump start your setup.
- White Steps are enhancements, not included in the sample form + workflow.
Note: In many of the descriptions below for outgoing steps to Jira or Bitbucket you will see placeholders like [your-env-url], [your-username], [your-password] and corresponding fuzzed out areas of the screenshots masking sensitive details. They all would need to be replaced with values appropriate for your environment / connection.
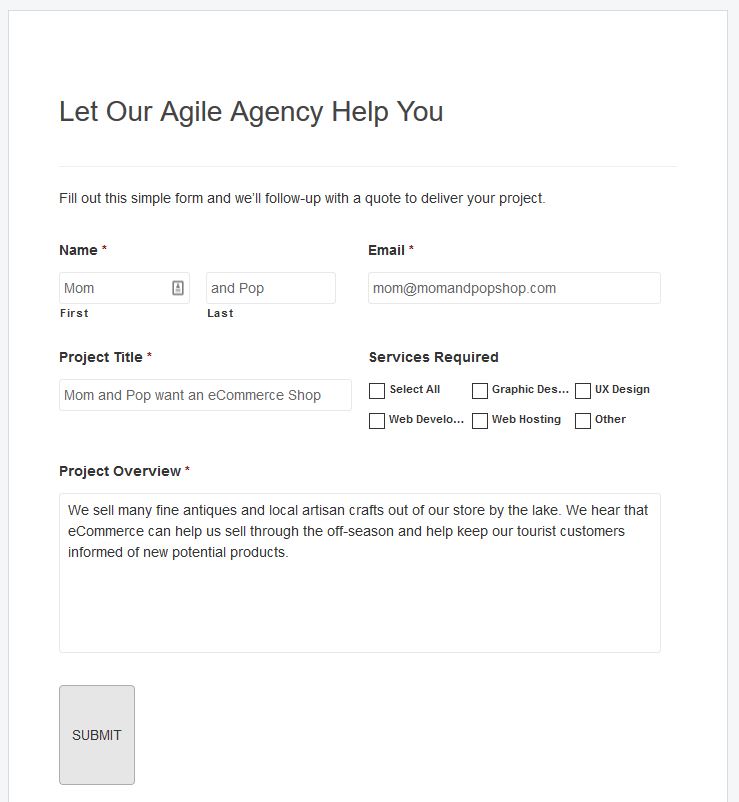
1) Project Request – Form Submission
Capture what we need to know from the customer about the project.
2) Create Customer – User Registration Step
With the User Registration Add-On for Gravity Forms, you can turn name + email fields into a WordPress user account. This is useful both for assigning future steps to as well as follow-up interaction with potential customers.
3) Work Summary & Costs – User Input Step
 An accurate estimate that demonstrates the value to a potential customer is key. Too high and they might begin to think that offer from Uncle Tony’s second cousin who just finished Grade 10 seems much more attractive. Too low and long-term our agency won’t survive unless everyone REALLY enjoys eating ramen.
4) Solution Review – Approval Step
An approval step with the option to revert to a user input step lets our team lead(s) review all estimates and help junior staff understand items they may not have accounted for in the initial estimate before it gets sent to the potential customer.
5) Invoice Review – Approval Step
The moment of truth. Will the customer want to work with our agency and be amazed by how quickly our staff (and automation) jump into action the moment they have agreed to proceed with the project? Or, could they cycle through a few steps to confirm scope and price before deciding to proceed.
6) Payment – Stripe/Paypal Step Type
With the requirements, scope and project time/cost/materials confirmed, it would be a good time to use either the Stripe Add-On or Paypal Add-On for Gravity Flow to define a step to collect payment (or deposit payment) as a part of a workflow.
7) Define Project Keys – User Input Step
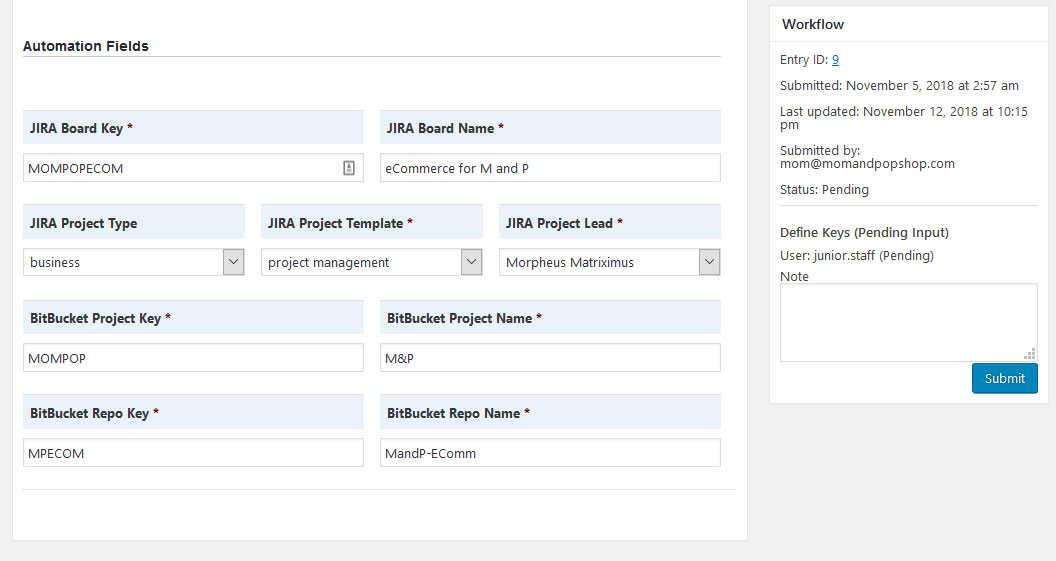 Each system we will be calling (Jira, Bitbucket) has different data requirements to their API requests. It would be quite possible to use the same field for multiple API requests, but for demonstration purposes, we’ve made each one separate fields based on tooling. For a non-demo version, you would also want to apply custom field validation rules to ensure the data is captured right the first time to prevent API step failures later on.
8) JIRA Board Validation – Outgoing Webhook Step
Idempotency – A strange word but important concept
When it comes to working with APIs, and Rest APIs in particular, idempotency is an important concept. In a non-technical sense, it could be simplified to the idea of ‘Trust but Verify’ or ensuring software clients (websites, browsers, etc) can make that same call repeatedly and expect to produce/receive the same result. We’ll get into the specific API endpoints and details required to submit in the next section, but for now, consider the scenarios that happen when running our workflow multiple times with and without the validation check.
| Trust Without Verify | Trust But Verify |
|---|---|
|
|
Without the verification, we do not know whether the 2nd attempt to create failed because of the structure of our request, the content the request contained or the (actual issue) that the board already exists. With the verification, we have a separate step/response code which we can use to determine whether another API call is needed via the next step options of our workflow step.
But how do you discover what API endpoint to call and what data to pass? A good user interface makes it easy to identify where / how to complete tasks…For APIs that generally leads to reading the API documentation and Atlassian has very good docs for their APIs. For JIRA they outline both the structure of their API Spec and the reference details for each endpoint.
Step Settings
In this outgoing webhook step to validate if the JIRA board already exists, the step settings define a GET request to http://[your-env-url]/jira/rest/api/2/project/{JIRA Board Key:1} and include a merge tag of the potential project key. The JIRA API Docs for that endpoint indicate it will either return:
- Response code 200 with JSON body that includes the URL to the board in the ‘self’ key/value.
- Response code 404 that project is not found.
Using this info, we can attempt to map the response field (self) into our form field for the JIRA Board URL and route the next step in the workflow to the appropriate step based on the evaluation of the response code.
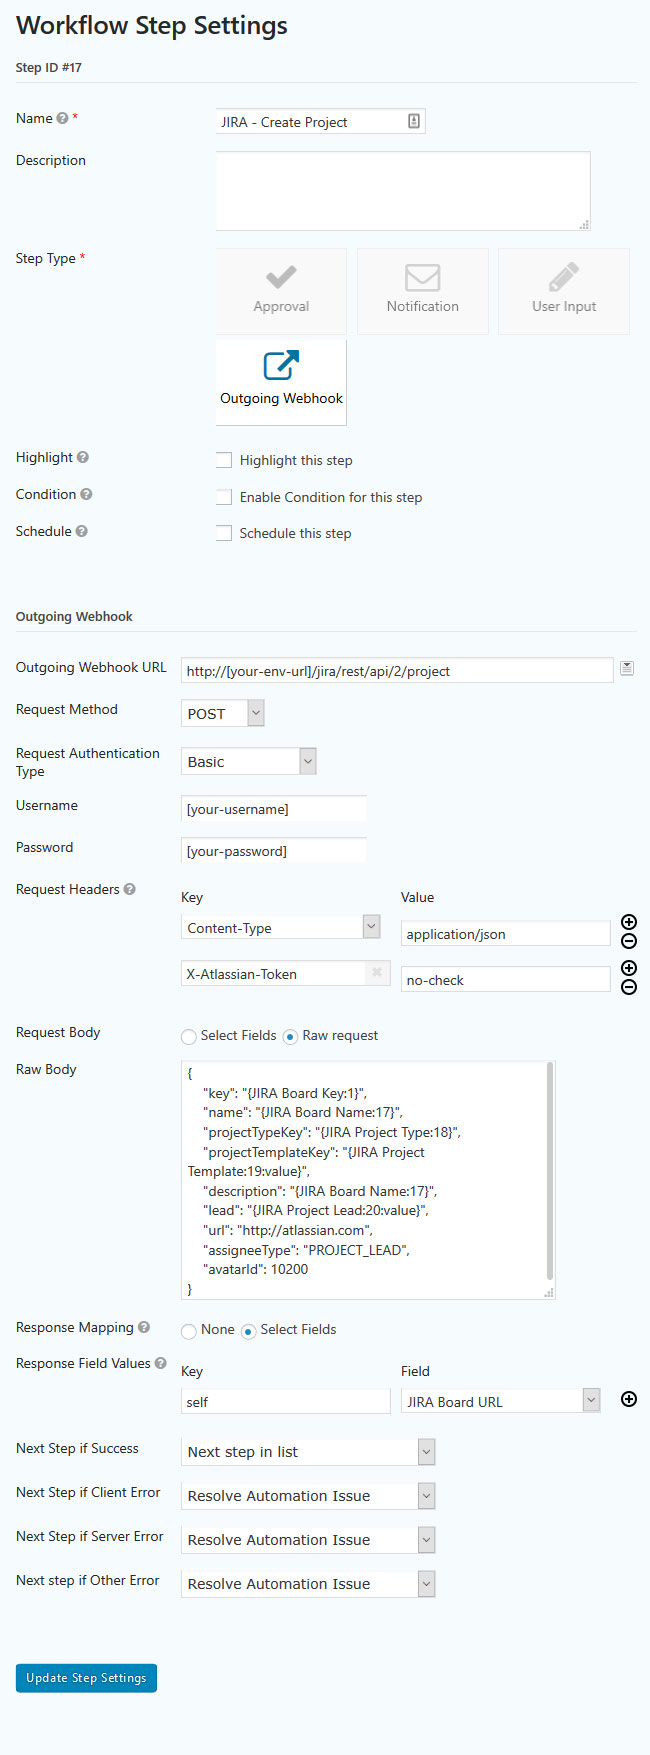
9) JIRA Board Create – Outgoing Webhook Step
Time for the workflow to actually automate something! Note that example workflow uses Basic Authentication which the self-hosted Jira environment supports. The Jira Cloud requires oAuth which at this time would still require custom code to support through a Gravity Flow step. The step is a POST to the Create Project endpoint
Step Settings
 Outgoing Webhook URL – http://[your-env-url]/jira/rest/api/2/project
- Request Method – POST
- Request Authentication Type – Basic
- Username – [your-username]
- Password – [your-password]
- Request Headers
- Content-Type – application/json
- X-Atlassian-Token – no-check
- Request Body – Raw Request
{
“key”: “{JIRA Board Key:1}”,
“name”: “{JIRA Board Name:17}”,
“projectTypeKey”: “{JIRA Project Type:18}”,
“projectTemplateKey”: “{JIRA Project Template:19:value}”,
“description”: “{JIRA Board Name:17}”,
“lead”: “{JIRA Project Lead:20:value}”,
“url”: “http://atlassian.com”,
“assigneeType”: “PROJECT_LEAD”,
“avatarId”: 10200
}
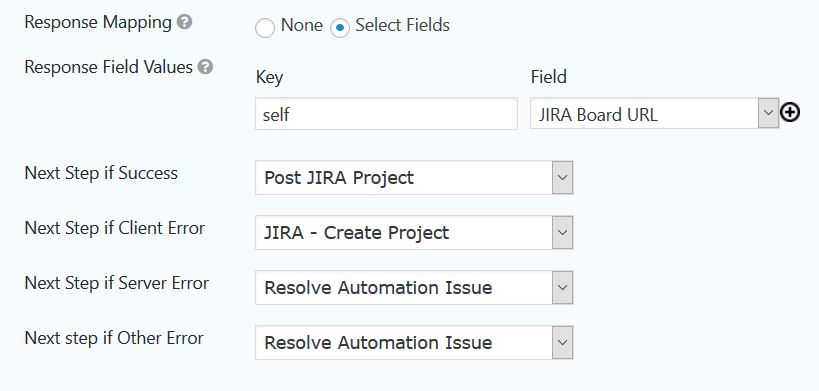
Note: If the request structure does not involve nested key/value pairs you can also use the Select Fields option for Request Body. You’ll see examples of this in the Bitbucket project/repo create steps. With the raw request format, you use merge tags to map in your field data into the JSON key/value pairs. - Response Field Values
- Key: self
Field: JIRA Board URL
- Key: self
- Next Steps
In this demo workflow, there is a User Input step – Resolve Automation Issue – which we route any unexpected responses to for manual follow-up. Otherwise, a success response code (200 series) means our board has been created.
Testing
During early iterations of building your automation workflow, you may trigger steps that get error response codes. The default timeline entry for the webhook gives you summary details that aren’t always enough to troubleshoot the issue with.
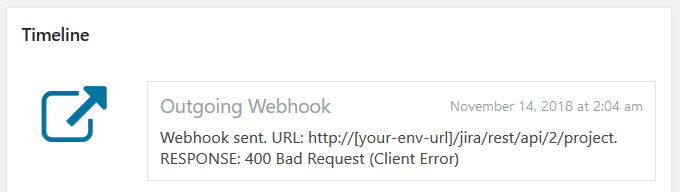
To troubleshoot exactly what the nature of that error 400 we can activate Gravity Forms logging and refer to the Gravity Flow log when re-running the request:
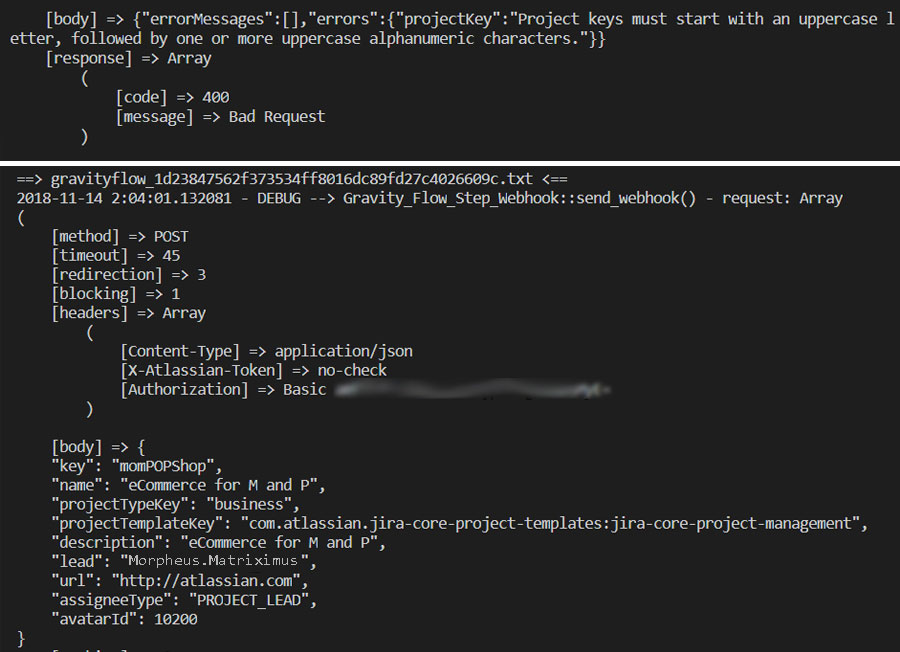
As mentioned earlier, for demo purposes, I can simply modify the entry to have the expected capitalization and project lead. In a non-demo version, you would want to consider adding criteria details to the field description and field validation to ensure the data entry matches requirements of the API data.
Result
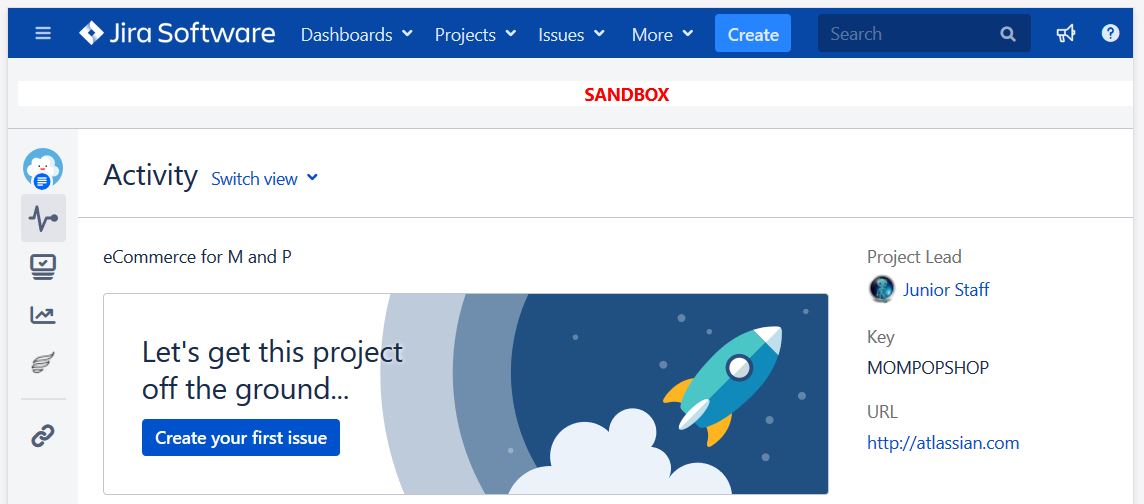 The new JIRA board is ready and waiting for new user stories and tasks to be added. Your robust workflow might make additional calls to add users with permission access to the board, or your JIRA instance may already have user/group policies that will assign them automatically.
10) Bitbucket Project Validation – Outgoing Webhook Step
Our workflow is now moving on to Bitbucket Project and Repositories but you’ll notice that 2-step pattern of a GET to validate and POST to create repeats with different configurations defined in each step setting. Again, the Atlassian documentation for Bitbucket Server is quite good.
- Bitbucket Server Rest API overview
- Bitbucket Server Rest API Types
- Bitbucket Server Rest API Endpoint Details
- Project GET / POST
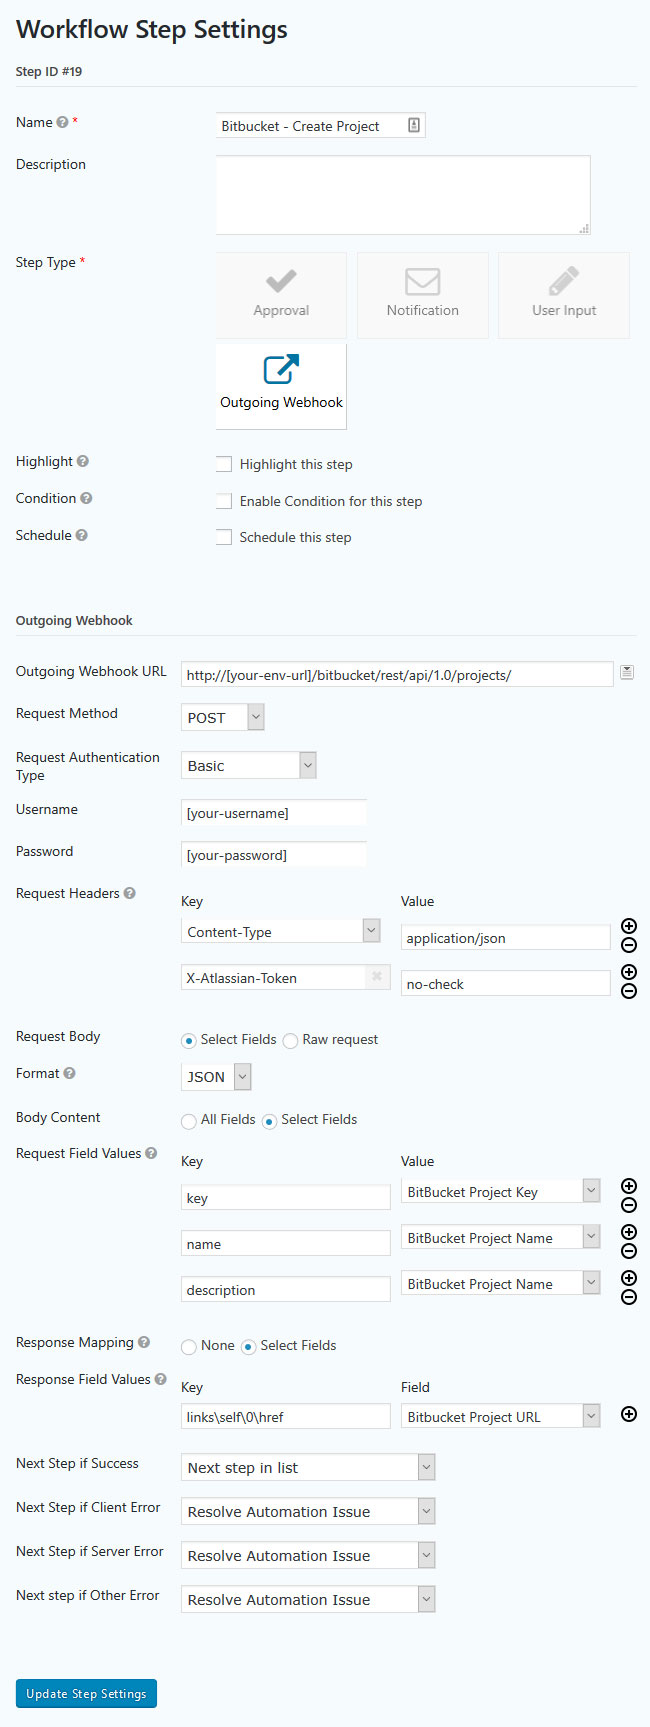
11) Bitbucket Project Create – Outgoing Webhook Step
Step Settings
-
- Outgoing Webhook URL – http://[your-env-url]/bitbucket/rest/api/1.0/projects/
- Request Method – POST
- Request Authentication Type – Basic
- Username – [your-username]
- Password – [your-password]
- Request Headers
- Content-Type => application/json
- X-Atlassian-Token =>no-check
- Request Body – Select Fields
- Format – JSON
- Body Content – Select Fields
- Request Field Values
- key => Bitbucket Project Key
- name => Bitbucket Project Name
- desc => Bitbucket Project Name
- Response Mapping – Select Fields
- Response Field Values
- links\self\0\href => Bitbucket Project URL
The Outgoing Webhook settings got a big update in Gravity Flow 2.3.2 to enable response field mapping that is both simple and powerful which we are using in this case. Look at the JSON object which the Bitbucket API returns upon successful project creation. The part we are actually interested in is highlighted in bold and the nested keys to get to it in orange.
{
    "key":"MOMPOP",
    "id":623,
    "name":"M&P",
    "description":"M&P",
    "public":false,
    "type":"NORMAL",
    "links":{
        "self":[ {
            "href":http://[your-env-here]/bitbucket/projects/MOMPOP
            }
        ]
    }
}
By the defining the response mapping key of links\self\0\href Gravity Flow will traverse the response structure to retrieve the exact data we need (new project URL) and map it into a single field without needing to write a single line of code! It even handles array elements as the 0 in our example shows.
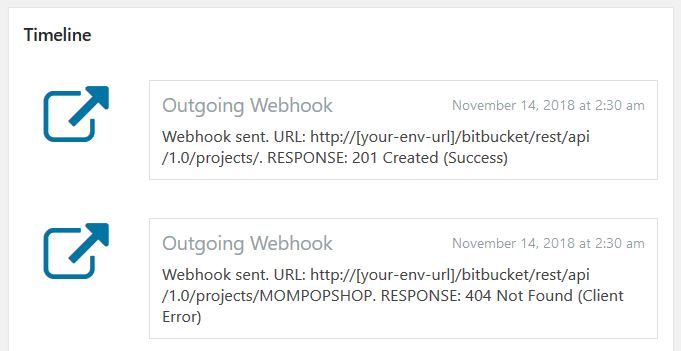
Result
The recent timeline shows our validation step (GET) confirming the project did not exist (404) followed by the create step (POST) completing successfully (201). With a small amount of code, you could customize the timeline message to include more information about each webhook request/response.
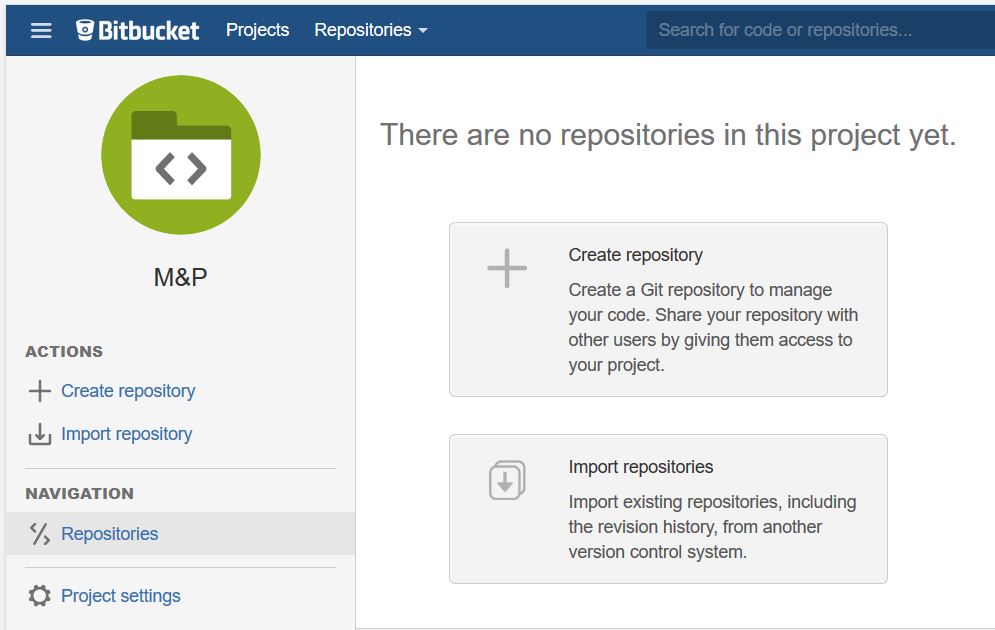
The Bitbucket web interface now shows our created project is ready and awaiting new repositories.
12) Bitbucket Repo Validation – Outgoing Webhook Step
To paraphrase the too simplistic instructions from a bottle of shampoo (that being “wash, rinse, and repeat”), the step setup process can become as simple as:
- Duplicate an existing set of outgoing webhook steps for validation (GET) and create (POST)
- Review the documentation for the new API endpoints to be called (Bitbucket Repositories)
- Update the settings webhook URL, connection details, request and response field mappings
- Iterate as required.
 For Validation (GET) of a Bitbucket Repository the important settings are:
- Outgoing Webhook URL – http://[your-env-url]/bitbucket/rest/api/1.0/projects/{ProjectKey:21}
- Request Method – GET
- Response Field Values
- links\self\0\href => Bitbucket Project URL
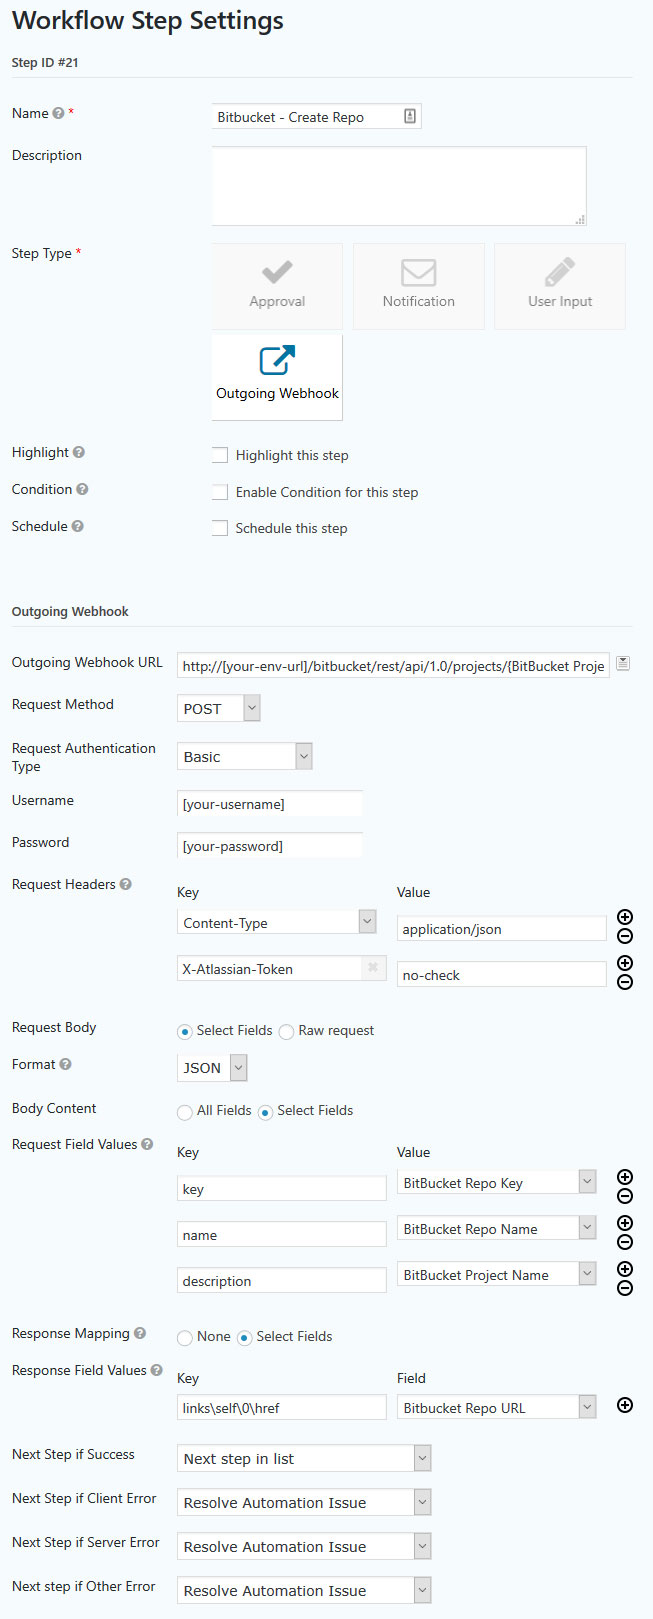
13) Bitbucket Repo Create – Outgoing Webhook Step
Step Settings
- Outgoing Webhook URL
- http://[your-env-url]/bitbucket/rest/api/1.0/projects/{BitBucket Project Key:21}/repos/
- Request Method – POST
- Request Authentication Type – Basic
- Username – [your-username]
- Password – [your-password]
- Request Headers
- Content-Type => application/json
- X-Atlassian-Token =>no-check
- Request Body – Select Fields
- Format – JSON
- Body Content – Select Fields
- Request Field Values
- key => Bitbucket Repo Key
- name => Bitbucket Repo Name
- desc => Bitbucket Repo Name
- Response Mapping – Select Fields
- Response Field Values
- links\self\0\href => Bitbucket Project URL
It’s nice that Bitbucket has consistent structures to their responses. If you were running additional workflow steps to add users to the repository you would want to work with the /rest/api/1.0/projects/{projectKey}/permissions/ endpoint for additional steps.
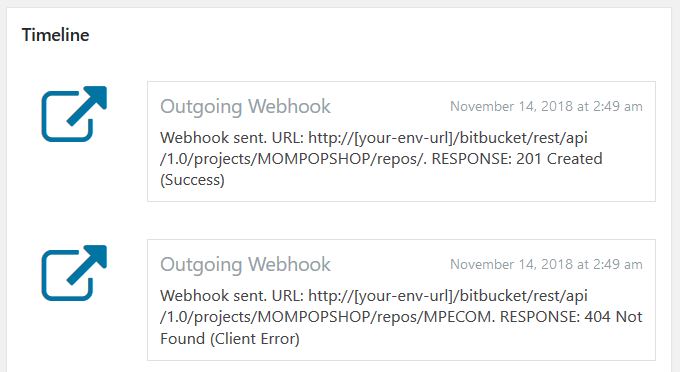
Result
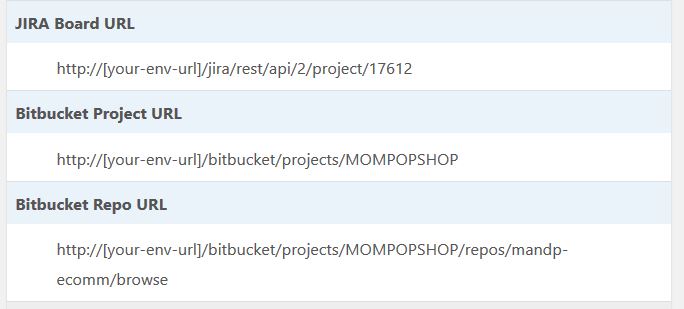
Again we see the validation step (GET) confirm the repository did not exist (404) followed by the create step (POST) completing successfully (201) and our entry now contains all 3 URLs for systems that have been automatically created.
14) Populate Stories + Initial Code – Approval Step
An approval step after all automated tasks have completed successfully offers our staff a chance to verify key details and pre-populate agile stories, tasks to JIRA before sending a notification to the customer announcing project has begun. While it doesn’t appear that JIRA API supports bulk import yet if your business process had more up-front scoping discussions with the customer you might look at JIRA CSV importers for issues to improve some of this task.
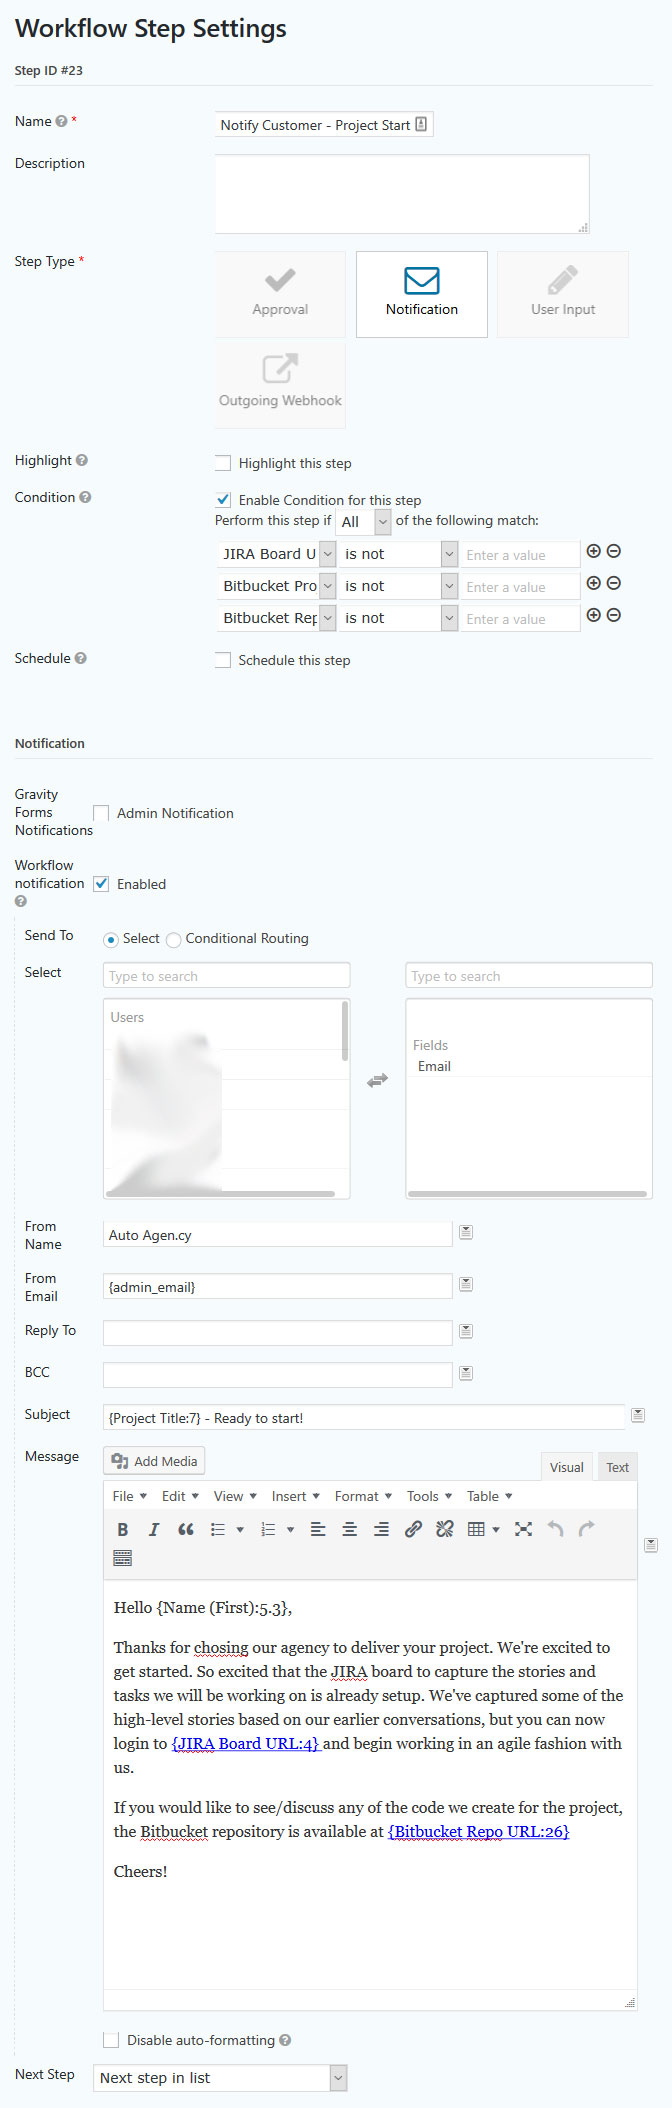
15) Project Start – Notification Step
Remember that “Trust, but Verify” concept mentioned when initially discussing the API step setup? It’s also an important concept to keep in mind for any steps downstream from automation, particularly where they lead to direct customer communications. In the step settings for the project start notification, additional conditions have been added to ensure the notification will not send if any of the referenced URLs are blank.
Conclusion
This article demonstrates how easy it can be to build out an automated process with Gravity Flow exclusively through configuration or very low code scenarios. While it has used Atlassian Jira and Bitbucket as examples, the approaches would map well to other software and project management tools that have strong + documented APIs such as Trello, Asana and Github.
Download the Example Form + Flow from this article
If you do use the Form + Flow to help jump-start your setup remember:
- Each step that makes an API call will have placeholders you’ll need to replace for your environment which may be different for your JIRA, Bitbucket or other systems. These include: [your-env-url], [your-username] and [your-password].
- Identify whether you can consolidate separate fields on the form or custom field validation to ensure the user input step to define keys doesn’t lead to API step failures due to the data format.
Want more examples of automation with Gravity Flow?
Our Case Studies highlight examples where customers are using Gravity Flow to automate various parts of their business. We also have some detailed walkthroughs in the documentation. Have you already been using Gravity Flow as a part of a DevOps process like this article demonstrates? Please get in touch as we are always keen to hear and share other stories of success with Gravity Flow
If you’d like to find out more about how process automation can help make your organisation more efficient, please get in touch.
