
An employee onboarding process, with its cross-department coordination and processes, is a pretty fair way for a new hire to judge how well an organisation functions. Do it well, and you’ll not only onboard new people in less time and with less effort, but you’ll impress your new hires and help them get off to the perfect start – every single time.
In this post, I’ll take you through a new hire checklist and then I’ll show you how to use Gravity Flow to automate your new hire onboarding.
We will cover how to create a new employee onboarding process that coordinates the activity of multiple departments so everyone can get on the same page and make a great first impression. Then, to centralize employee information and keep the rest of your team informed of staffing changes, we’ll also be sending data to a self-updating employee directory using Airtable.
Why use Gravity Flow for onboarding?
This is based on the same process that I’ve used to onboard hundreds of employees and it can be customized to fit different organizations, from growing small businesses to large organizations.
Gravity Flow allows anyone to create and modify workflows, even those without an IT background, which means your processes will be kept up-to-date by the process owners themselves rather than the IT department. This makes it very cost effective to build and maintain.
To use Gravity Flow, you’ll need to utilize WordPress and Gravity Forms, which you’re probably already using for your organization’s website, so there’s no need to take on additional costs.
I recommend utilizing WordPress multisite. You can create a different subsite just for employees that is completely password protected and keep it separate from your customer-facing site.
Why use Airtable?
Each department and each person within a department uses employee data in unique ways. Airtable allows you to display the employee information in different formats and each view can be customized by each user.
It is also highly user-friendly. Out of all the tools I’ve tried to introduce, from Google Docs to whiteboards with sticky notes, Airtable was adopted by everyone, even those who were resistant to new technology.
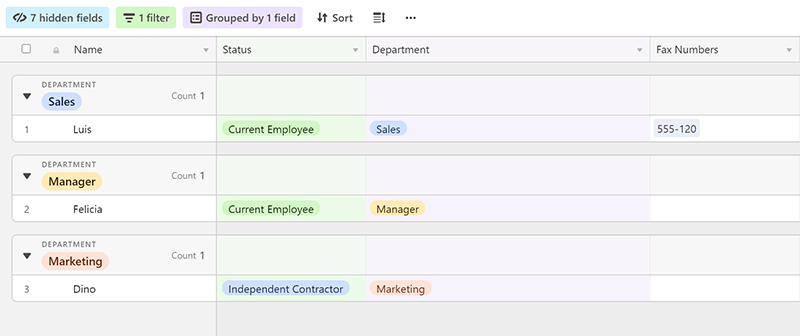
Airtable is ideal for individuals who prefer working within the more traditional spreadsheet format but there are also Kanban boards, calendars, relational tables and other features that the tech-savvy people on your team will love.
Airtable also has a flexible API that you can tap into with Zapier, which is what I’m going to show you as we build the workflow.
It’s also possible to use the Outgoing Webhook step built-in to Gravity Flow if you prefer not to use Zapier.
If you want a solution that is within WordPress, GravityView is also a great fit. With Airtable, once you exceed the free plan you will need to pay per user. With GravityView, you’ll only need to pay for one license.
New Hire Checklist
Start building your workflow by creating a checklist of the steps you need to accomplish to successfully onboard a new employee.
Only around 20% of organizations onboard new hires properly. If first days leave you feeling panicked because nothing is ready, then starting off with a checklist, like the following, will help you be prepared for the employee’s first day and ensure you’ve covered all your bases.
- Set Up Payroll
- Fill Out Required Government Paperwork
- Complete Job Application
- Schedule Training
- Set Up Computer and Phone
- Distribute Important Information (Org chart, employee handbook, etc.)
- Prepare Workspace
- Provide List of Passwords
- Create Software Accounts
- Order Business Cards
Here’s the simple workflow we’re going to be creating in this tutorial.
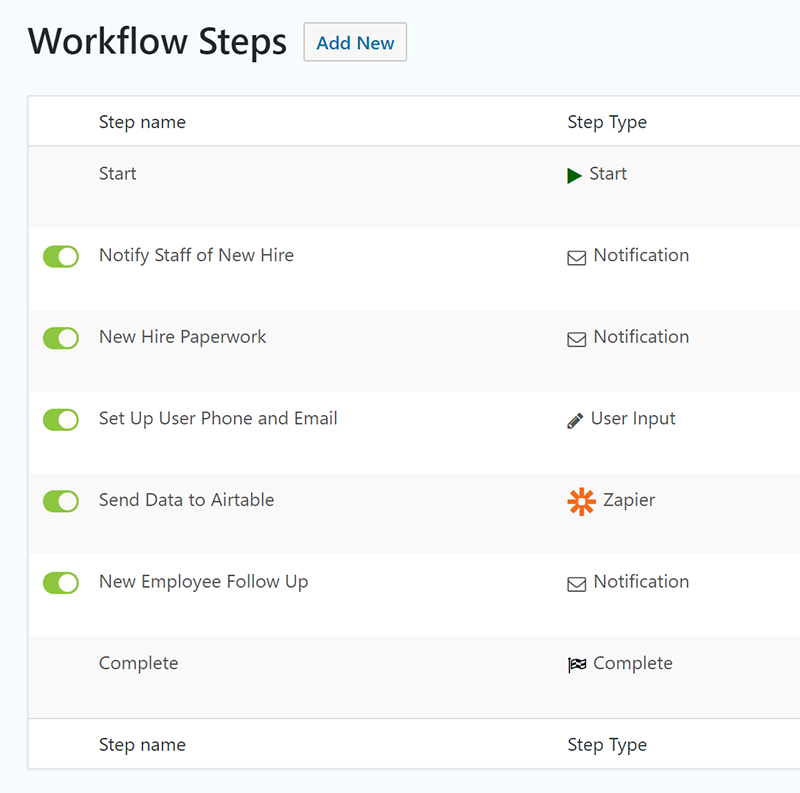
Creating an Onboarding Form in WordPress
The first step is to create a new form using Gravity Forms with fields for all the information you need to collect. When the candidate accepts the position and a start date has been set, then the hiring manager will fill out the new hire form.
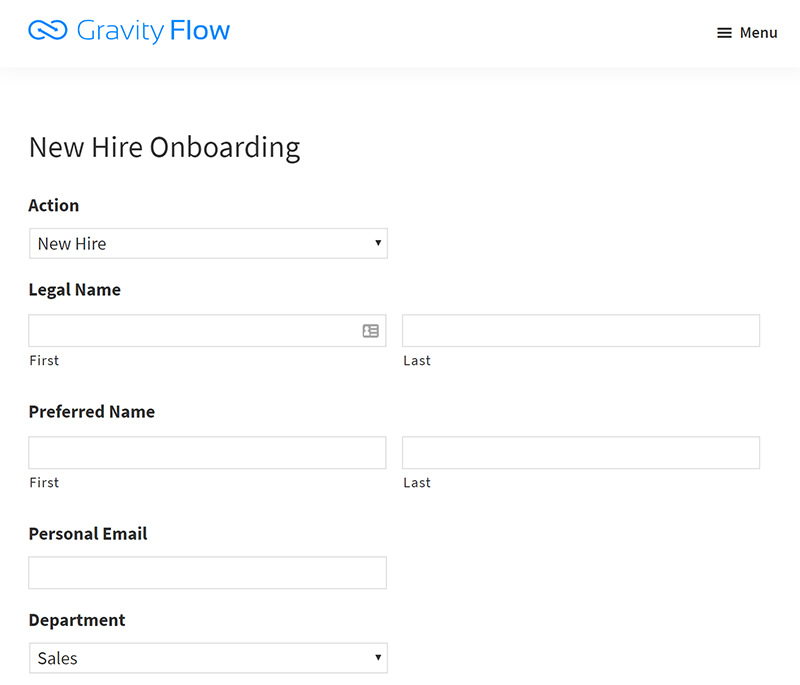
We can use this form not only for new hires, but also for employee promotions so that we can keep our Airtable up-to-date with the right titles. We can use conditional fields in Gravity Forms to hide the fields that aren’t relevant for promotions. For instance, we would already have the employee’s birthday on file, so we wouldn’t need this information in the event of a promotion.
Here are all the fields in my sample form:
| Field | Visibility | Notes |
| Action | Visible | Dropdown options: New Hire, Promotion |
| Legal Name | Visible | |
| Preferred Name | Visible | Include a field for nicknames such as Mike instead of Michael |
| Personal Email | Visible | |
| Work Email | Hidden | Advanced tip: Use Gravity Forms hooks to create a custom function that autopopulates this field with data from the name fields according to your email address conventions. |
| Assigned Phone Number | Hidden | Two fields are hidden, work email (above) and assigned phone number. The hiring manager doesn’t know this information yet, IT needs to provide this later in the workflow. We need to include all the fields now and hide the ones we don’t want to use until later. |
| Department | Visible | |
| Title | Visible | |
| Manager | Visible | |
| Needs the following software checklist | Visible | |
| Start Date | Visible | |
| Birthday | Visible |
Creating Your Airtable
When you complete your emails, the next step is to construct your Airtable. I created this free Business Support Functions Airtable that you can use. You can modify the Airtable to fit your needs, or create one from scratch.
You’ll see I have created a column for the fields on my form plus a few more.
Creating the Workflow
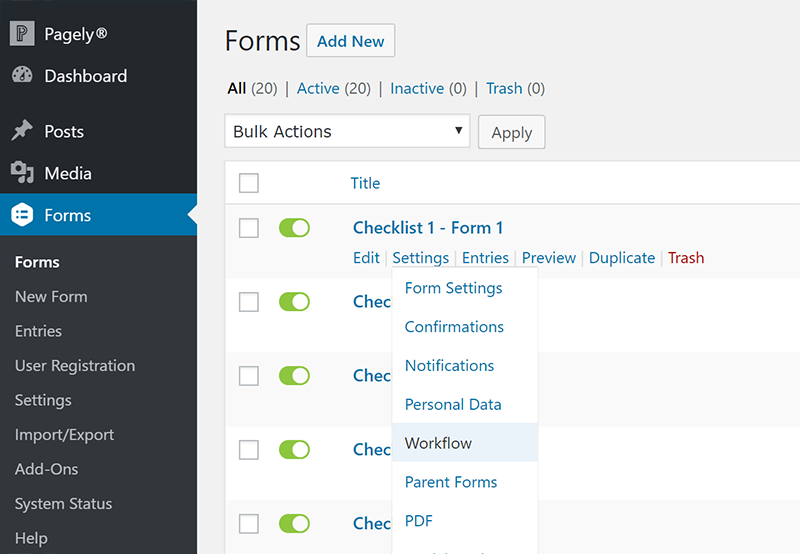
To begin creating the workflow, go to your forms and hover over the name of the form you want to create a workflow for. In the dropdown, select Workflow. Then click the Add New button to create a workflow step.
Step 1: Notify Staff
For the first step of the workflow, I want to notify HR, IT and the department manager that a new employee is starting so they can start preparing. I’m going to use the Notification Step.
Near the bottom, select the Workflow Notification checkbox option to open the configuration options for the email.
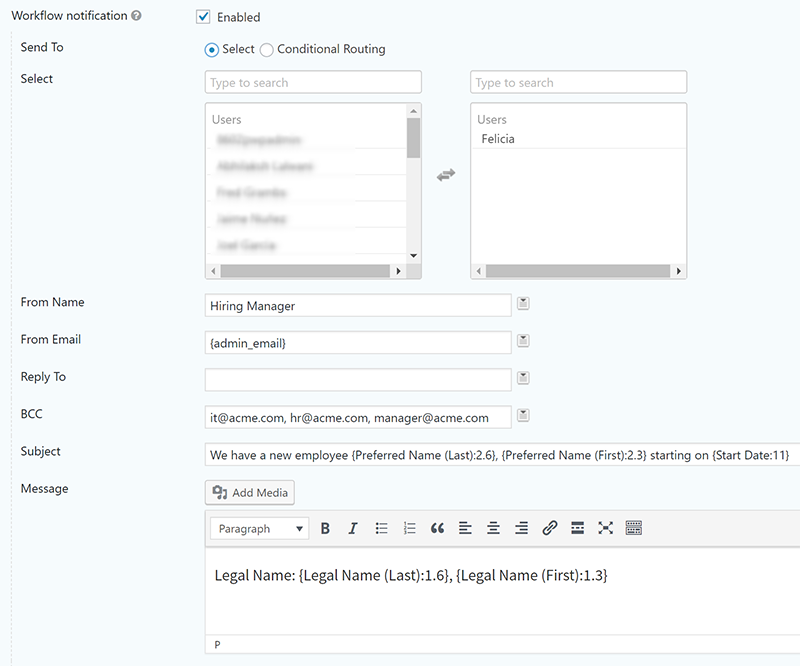
Notice how I use the merge tags in Gravity Forms to populate important information in the email, such as the start date. This feature allows you to give your staff the information they need when they need it.
For promotions, I can create a different email or replace new employee in the subject line with a merge tag for the action field, that way if the manager selects promotion, the email will substitute promotion in the email subject as well.
Step 2: Send Employee New Hire Paperwork
Filling out new hire paperwork on your first day is such a waste of the excited and eager energy your employee is bringing on their first day. That’s why I like to send new hires the documents ahead of time, so they can get a head start.
For our next step, we’ll send the new hire a welcome email from HR to their personal email with a link to where they can go to download their new hire forms.
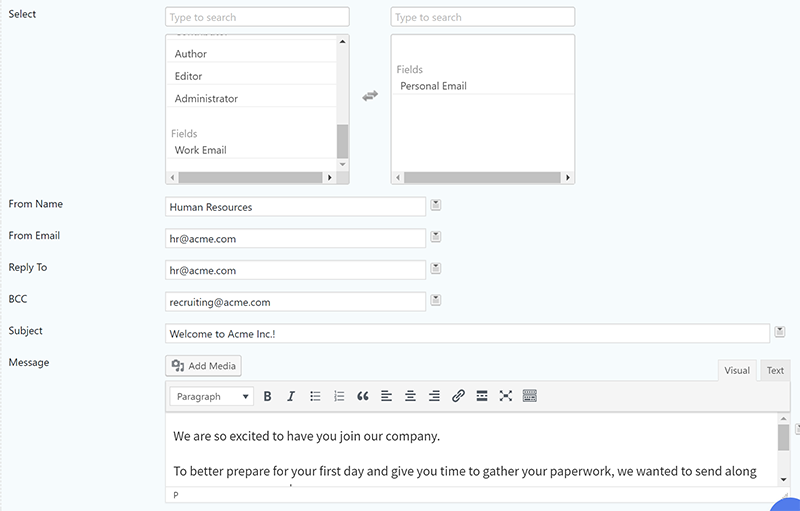
You can specify who you want the email to come from, which is a VERY helpful feature. For the employee handbook and new hire paperwork email, I want this email to come from [email protected]. This way if the new hire responds with additional questions, the email will go to the right person and prevent the spread of incorrect information.
Step 3: Create a Task for IT
Later in our workflow, we want to create a task for the office manager to order business cards, but first, we need IT to assign the new hire an email and phone number and then pass that information along.
Tasks that require multiple people to complete are typically the most challenging. You typically end up with people pointing fingers when things don’t get done, or there are communication issues across departments and important information doesn’t get passed along. For instance, if one person doesn’t know who to send information to in another department, then it won’t get sent.
The good news is, this is where workflow software really shines because the system handles the delegation and communication. As you’re building the workflow, you’ll start to see where the gaps are in your process so you can set clear expectations and get everyone on the same page.
For this step, we’re going to create a User Input step and assign it to IT so that they can fill out those two hidden fields. I’m going to make this step conditional, so it only happens if the process is for a new hire.

I’m going to assign to the people in IT and make it so that they can edit those fields. This task will be assigned to both people, but only one has to complete it. Also, add yourself to the Assignee field so you can test the workflow.
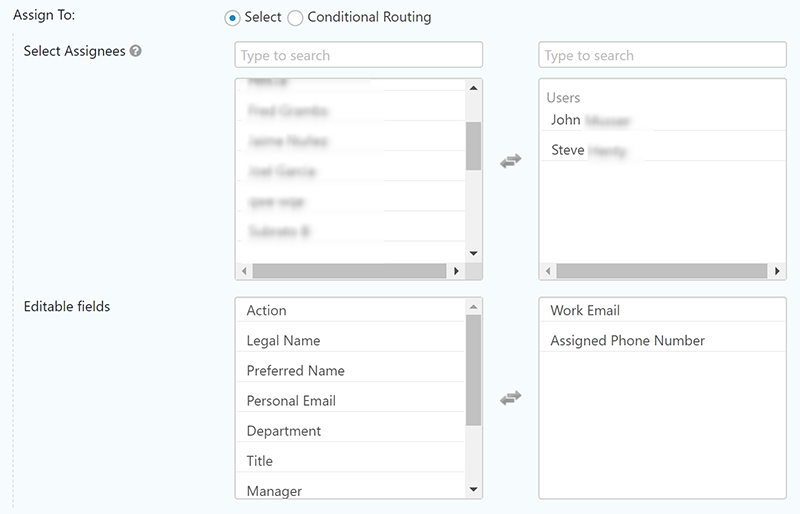
I’ll create an email as part of the task to let IT know that it needs to be completed.
Step 4: Send Information to Airtable
Now that we have all the new hire’s information, let’s send it to Airtable using Zapier.
You’ll need to install the Zapier Add On plugin for Gravity Forms.
Then in Zapier, I’ll create a new Zap that connects Gravity Forms to Airtable. Note that I’m connecting Gravity Forms not Gravity Flow.
I’m going use the Create Record option in Airtable when we have a new employee. If you’re going to use the form for promotions, use the Update Record option.
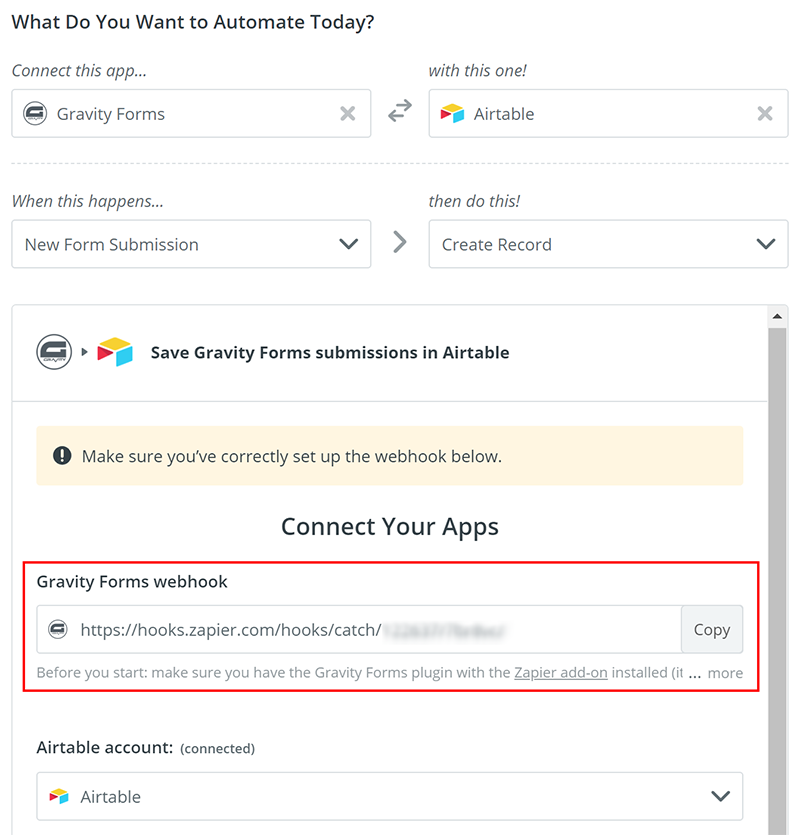
Copy the Gravity Forms webhook and go to the Zapier section of your form and create a new feed.
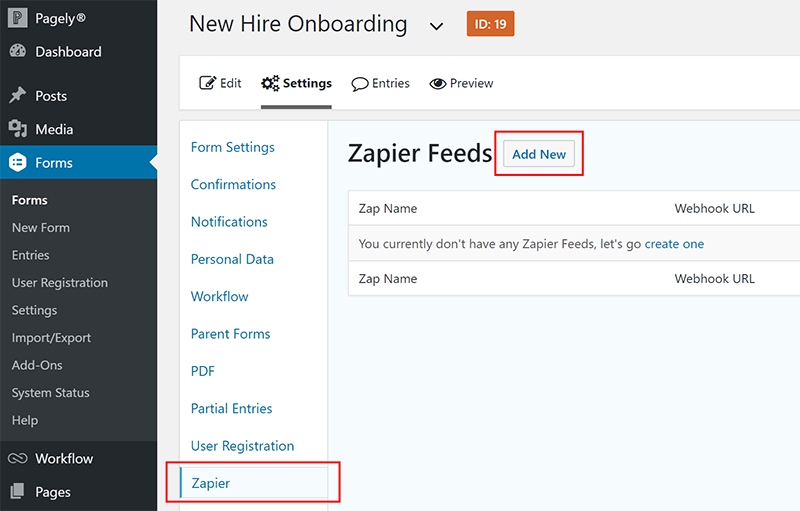
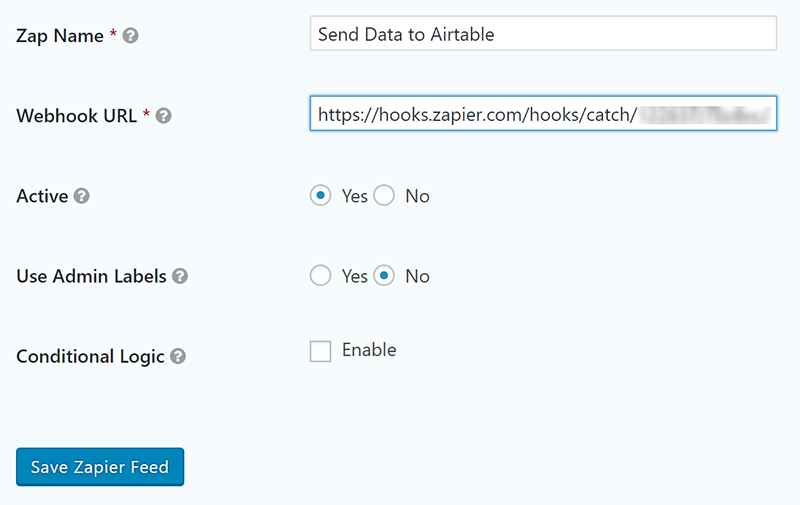
Name your Zap so you can identify it, and then paste in your webhook and save.
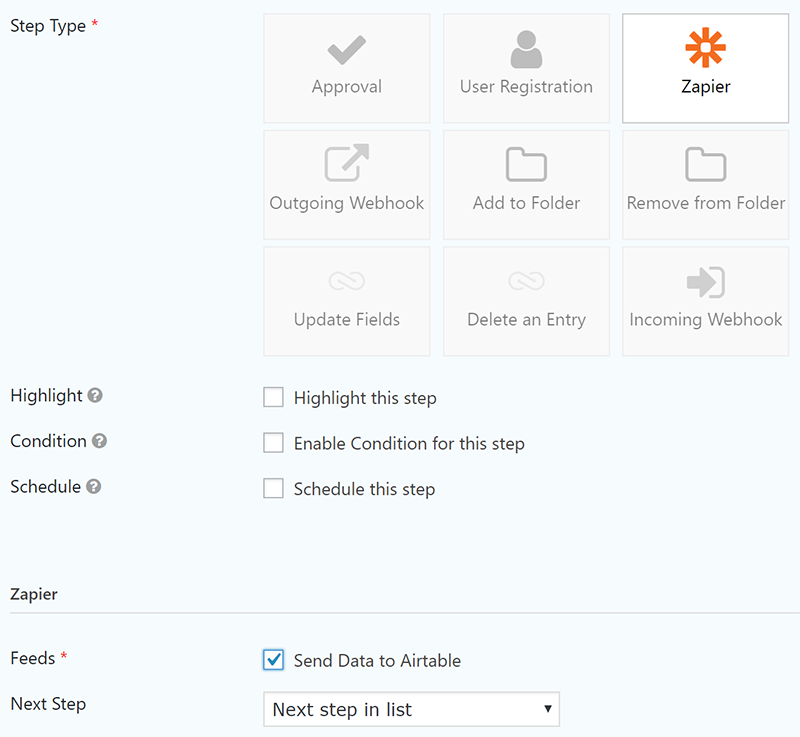
Then go back to the Workflow section, create a new step and select Zapier for the step type. Select your newly created feed in the Feeds section.
Now, when the IT department completes the previous step, the data will automatically populate your employee directory on Airtable.
Zapier needs to receive a test entry so, if you’re following along, now’s a good time to submit the form so you can complete the setup for Airtable and match up the fields.
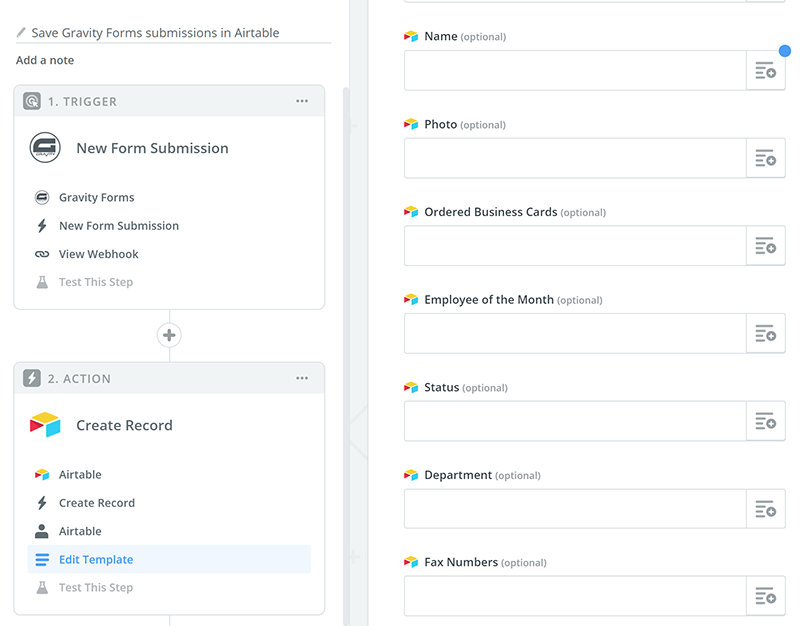
Save the Zap and turn it on. When someone hires a new employee and the IT department sets up their account, their data will be automatically transferred to Airtable.
Here’s a detailed tutorial on how to use Zapier with Gravity Flow.
Using Webhooks to Transfer Data
Zapier isn’t the only way to transfer data. You can use the Outgoing Webhook step type if the software that is receiving the data has an API.
Airtable will generate customized API documentation for your bases. You can see the documentation for your bases here.
I recommend factoring in a software system’s API into your decision making when choosing the software you want to implement because it will save you time when creating accounts for new employees. If you can manage user accounts with the API, then you can offload this task from IT and have the workflow create accounts via automation.
The phone system I was using, for instance, would allow me to create user accounts via an API so I didn’t have to wait for the IT department to set this part up for me. The accounts were created instantly as a part of the workflow.
Learn more about using the outgoing webhook option in Gravity Flow.
Testing The Workflow
If you would like to see how the Airtable works, fill out the new hire form by clicking on the button below.
When you submit the form, you’ll receive the emails that are a part of the workflow and you be able to complete the User Input step and see the data carry over to the Employee Table in Airtable
Additional Steps
We’ve barely scratched the surface on what’s possible with Gravity Flow.
An important onboarding step that is usually forgotten if for a supervisor to check in with the employee after a few days to see how they are getting on.
To do this in Gravity Flow, select the notification step and click on the schedule this step checkbox.

Then you can compose an email from the supervisor, or even a busy executive and trust that it will be sent automatically.
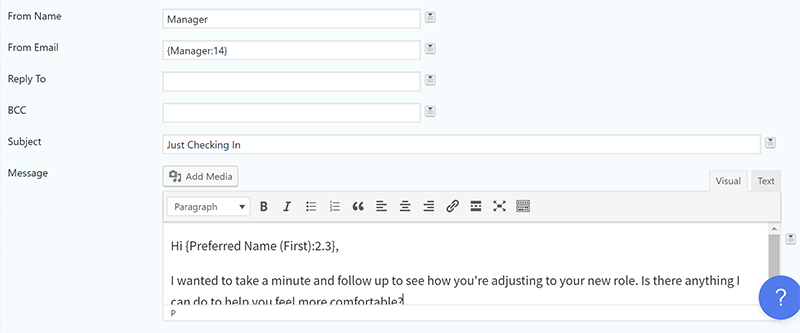
For the next steps we can:
- Create an approval task for the Office Manager to complete once he or she ordered business cards.
- Create a welcome email from the CEO that is delayed until the new hire’s first day
- Notify the hiring manager that the workflow is complete and everything is ready
Refer back to the new hire checklist if you need additional ideas.
I find that just starting with a simple workflow like the one we created in this article is a great way to get started. When you hire a new person, make a note of what steps in your informal workflow your staff forgets, then take 10 minutes to create a workflow step to address it. You’ll soon have a 50 part workflow with 20 Zaps and a full Airtable like I did that to handle new hires, promotions and terminations.
Why stop there? I used various forms to fill out the other components of my Business Administration Airtable and then shared it with various departments, greatly improving internal communications and keeping emails out of my inbox.
Final Thoughts
Onboarding is more than adding a person to your organization. Welcoming a new individual to your organization and making them feel included is vital for maximizing success.
The sooner new employees feel engaged in their new positions, the sooner they can start making meaningful contributions.
With this process you can automate the tedious tasks and free up your time to focus on really connecting with your new hire by offering mentoring, communicating goals and introducing them to the culture of the organization.
Enter Your Email to Get the Bonus Content so You Can Create Your Own New Hire Process: New Hire Onboarding Checklist and Sample Form |
Author: Felicia Ceballos-Marroquin
