
If you have never undertaken the process of creating a workflow from start to finish, it may feel like a complicated process.
While building a workflow can take time, especially when it comes to planning, processes, and testing, it isn’t as daunting as it seems if you know what you’re doing. The key is in knowing how to start.
You first need to know how complicated your workflow will need to be, which means you will have to understand the difference between a simple project workflow versus a complicated process workflow.
After that, it comes down to choosing the right visual representation of your workflow and then following a few basic steps.
Projects vs. Processes
Building a workflow for a single project is not the same as creating a workflow for a business process, which is why it’s important to understand the difference.
In order to build a project workflow, you would generally need to group a series of one-off tasks in order to accomplish a goal. This might include:
- Identifying the ultimate outcome
- Creating a series of steps involved to reach the outcome
- Listing any one-off tasks and documents involved in each step
- Identifying the order that each task needs to occur in
- Assigning tasks to a person, if necessary (some tasks may be automated)
- Setting a duration for each task and step
Projects are often completed using project management strategies and software (like Microsoft Project). Project management involves the initiation, planning, design, execution, monitoring, control, and closing of a team’s specific goal, usually involving a certain set of criteria that needs to be met.
The biggest difference between project management and process management is that project management has a temporary, constrained scope, quality, budget, and timeframe.
Creating a workflow for a process, on the other hand, involves defining processes that need to be managed throughout the organisation, which may include repeatable projects and grouped tasks. It also requires visualizing, measuring, controlling, reporting, and, improving that process over time, with the goal to increase productivity and/or decrease costs.
While both are somewhat different, both project and process workflows can be organized in similar ways, using visual flowcharts and diagrams to document each stage, step and task.
Choosing the Right Flowchart or Diagram
Flowcharts and other diagrams can be used for project planning, system mapping, process documentation, or creating almost any type of workflow. But, not all flowcharts are created equal in terms of helping you achieve your ultimate outcome.
There are a few different flowchart types, including your basic flowchart for project planning as well as those more suitable for organizing complex processes, like the swimlane diagram.
Your basic flowchart looks something like this:
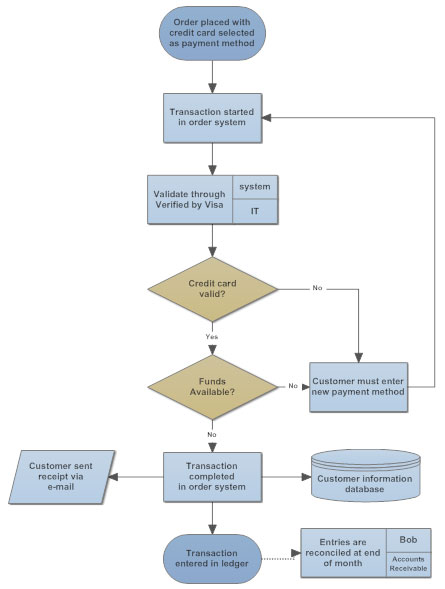
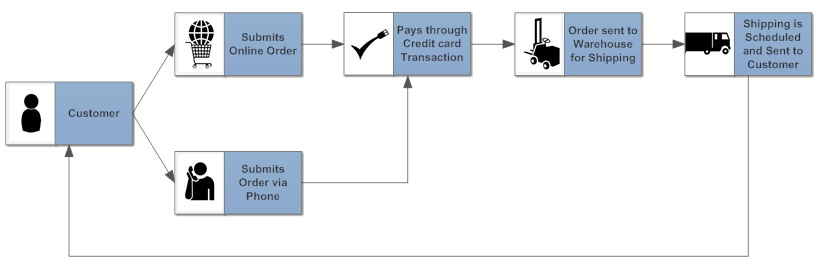
They can be useful when organizing a process that involves a series of tasks, like processing a customer’s order. You can even create a workflow to track your other workflows, like so:
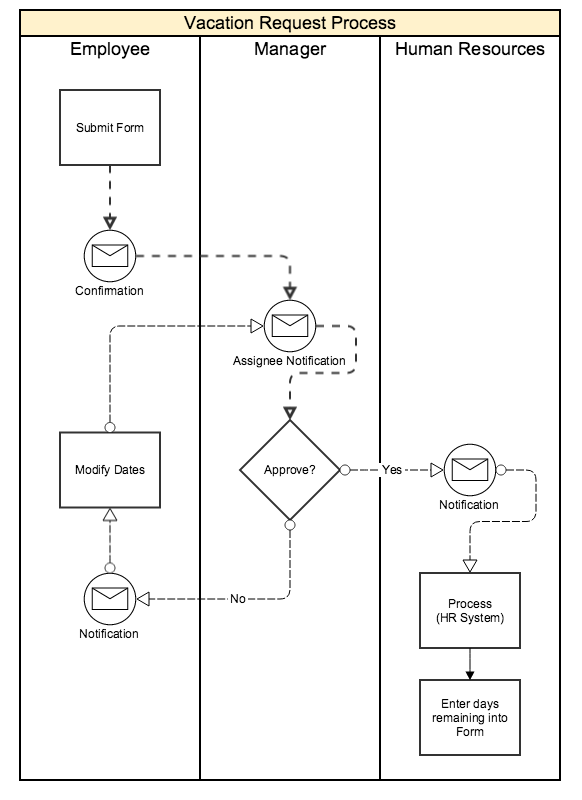
Projects and grouped tasks benefit the most from simple flowcharts, like waterfall charts. Processes involving more than one person typically require swim lane diagrams. Here’s a simple example of a PTO process:
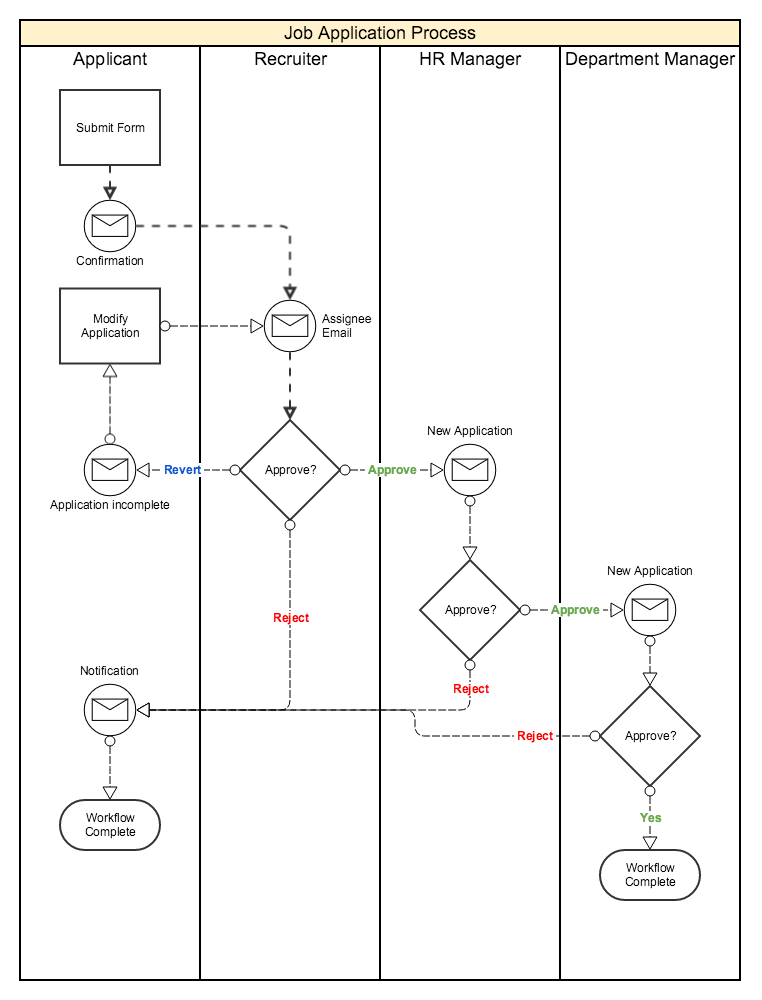
Swimlane diagrams can help you clarify even very complex processes. Here’s another example with more steps and roles:
How to Build Your Workflow Flowchart
Here is a general idea of what the organization process should look like from start to finish:
Step 1: Name your workflow. The name should help you identify your ultimate outcome, but don’t worry too much about this, as you can change it later.
Step 2: Identify start and end points. What events or tasks will trigger the process to start? How will you know when your outcome has been reached?
Step 3: Identify what is needed to perform the process. What tasks, documents, and actual materials (paper, pens, automation software, programs, etc.) are needed to complete the process?
Step 4: List any tasks and activities. What needs to be done to accomplish your outcome? State these in a verb/object format (e.g. approve the request, sign the paperwork, etc.). Each task may get its own box in your flowchart or diagram, so you can group minor tasks together if necessary.
Step 5: Identify the order tasks should be accomplished. Should certain tasks be finished before others can be started? Or can certain tasks be accomplished at the same time?
Step 6: Identify roles. Who will be involved in what tasks or activities? Some tasks may involve simple automation tools and no human approval, while others will need a review and sign off. Identify who is responsible for which task and process in your workflow. Add a swim lane for each role in your swimlane diagram.
Step 7: Identify your flowchart type and draw it out. Again, swimlane diagrams are best for processes, while a simple flowchart may work for projects or other smaller workflows. You can either draw one out by hand or use a tool like Visio, gliffy.com or draw.io.
Step 8: Review and finalize. After you’ve set everything up, you will want to test your workflow and review it to ensure that all processes are efficient and achievable and that everything accomplishes what it needs to accomplish.
Step 9: Use a workflow automation tool to create your actual workflow. Once your workflow is finalized, you can use workflow automation software to set up your actual workflow and integrate it with other software. Don’t forget to test your systems to make sure there are no hiccups throughout the process.
For swim lane diagrams, more guidance may be needed to truly capture all the roles and responsibilities. Further tips for building an effective swimlane diagram can be found here and here.
Final Thoughts
Keep in mind that the more complicated the process, the more complicated the flowchart will be, which means that you may either need to create a large flowchart or break down the process into multiple diagrams.
The process isn’t necessarily complicated once you get the hang of it, but it can be time-consuming, especially during the planning stages. Make sure you involve key team members in the brainstorm and planning processes before you start building your workflow or designing your flowcharts.
The more preliminary work you can do before you put pen to paper (or processes into your automation tool) the easier and faster your implementation and testing will be.
